Friday, May 29, 2015

Tetley & Good Earth Tea Review with White Chocolate Lime Scones


Welcome to Tea Time Tuesday this week!

This week we are mixing up some fruit and pairing some Pomegranate with Lime!


Sophia and I have been looking to sample some new iced teas for summer so we were excited when Tetley USA sent us some of their traditional Iced Tea Blend and a box of the Good Earth Pomegranate Burst to sample. Yeah!!


We decided to pair these delicious tea blends with a new scone recipe! 

White Chocolate with Lime Scones


First off, the GOOD EARTH Pomegranate Burst tea was really amazing. It truly has the essence of natural pomegranate flavors with a hint of cherry. A bright and cheerful burst for your taste senses!


This tea was sampled both iced and hot. It paired wonderful with our scones! We loved it both ways, but on this warm spring day, we preferred it iced.  

When I was opening the tea bags, the scent of cherry and fruit just filled the room!! 


I had to take some sips!!!!! YUM!!


Other fruity flavors that can be found in this refreshing tea include sweet blackberry and raspberry ~~~Ooh La La!!!

Next up we sampled Tetley's Iced Tea Blend. 


Honestly, I had never tried this brand and I am so glad I did. Tetley has a special blend specifically for iced tea and I must say it was very smooth and not at all bitter. I'm hooked. 

From Tetley USA: 

Round, stringless tea bags are made with our unique Perflo tissue - sturdy, yet soft and porous, for faster tea infusion and better flavor release. 2 tea bags makes 2 quarts of iced tea. 


Refreshing! 


So pretty!! 

Now for some Nosh!!

White Chocolate Lime Scones

1 3/4 cups flour + 2 Tbsp
2 tsp baking soda
1/2 tsp salt
1/2 cup sugar
6 Tbsp butter 
3/4 cup white chocolate chips
7 Tbsp milk 
3 tsp lime
1 tsp lime zest

Preheat to 400 degrees and line baking sheet with parchment. 

Mix the 1 and 3/4 cup flour (saving the 2 Tbsp for rolling the scones) with the sugar, baking soda and salt. 

Add white chocolate chips and then cut in the butter. 

Once crumbly, add milk, lime and zest. Stir till dough forms. 

Next, roll out the dough on a lightly floured surface and cut or shape into small discs (I use my 2 1/2 inch biscuit cutter).

Brush with milk and sprinkle with sugar if you like prior to baking. 

Bake at 400 for 9-12 minutes, checking your scones as oven times can vary. Mine runs hot so these only took 9 minutes. 

Voila! Yum


Enjoy!!!

*This is a sponsored post. Tetley USA sent me both their Iced Tea Blend and the Good Earth Pomegranate Burst (thank you!). Opinions here are honest and mine (and Sophia's) alone, thanks!! :) 

Sharing with some special Tea Parties:
Tea Time Tuesday
Tuesday Cuppa Tea
Friends Sharing Tea
A Return to Loveliness
The Charm of Home

As well as other great link parties found HERE


Thursday, May 28, 2015

Inspiration Thursday - Vogue's Article on Women & Hair Loss

Happy Thursday!

I really want to share something inspirational I read this week. 

It was a story done on Vogue's website entitled, "Stylish Possibilities for Hair Loss after Chemotherapy & Alopecia".


I came upon it because I follow Vogue on Instagram. 
It was very Inspiring. Not something I would expect from Vogue, but pleasantly surprised. I didn't use any of the photos from their website here, I wasn't sure of the copyright policy. However I really encourage you to check it out, the link is at the end. 

The article shares the story of nine spirited women who have dealt with hair loss either as a result of chemotherapy or alopecia.

I absolutely LOVED one woman's quote: 

"Beauty to me was always about fitting in, Now I just want to stand out." (Mia Sidaros) 

Many points in this article really touched me and I found myself questioning how I define beauty. 

Many women and girls struggle with self esteem, their self image and what it means to be "beautiful." I know I do. 

In the world today, where everything that is celebrated seems so perfectly coiffed, airbrushed, filtered and plumped up, it can often seem overwhelming. Where does one fit in there? It is articles like this that I find so important to share & discuss with my 11 yr old daughter. 

Maybe the answer is found in beautiful Mia's quote ...the answer is in standing out. Embracing ones unique qualities, gifts and imperfections. Taking the filter off and exploring what it means to be raw and human. 

It's scary though. 

I applaud Vogue for this wonderful article. For opening my eyes today to another view, another possibility. 


To view Vogue's full article I strongly encourage you to click Here

Sharing with several blog parties, links found Here.


Tuesday, May 26, 2015

Tip Me Tuesday - Fun Beauty Finds

Tip Me Tuesday - Beauty Finds!


A quick and often inexpensive way to freshen up your make-up routine is with a new shade of lip color. 

Here are two of our favorite new colors for summer!

I (Trisha) am LOVING this gloss from Marc Jacobs in the color Moonstruck. I was introduced to it via a fun beauty blogger I follow online and on Instagram called The Beauty Professor. You can visit her blog by clicking HERE!

Photo Credit

At $28 it is a bit of a splurge but I have to admit, so worth it. These lip glosses are reported to have "high shine" and they don't disappoint therefore if you prefer a matte lip color this is not for you.

From Sephora:

Marc Jacobs Enamored Hi-Shine Lacquer 

Enamored Hi-Shine Lip Lacquer delivers maximum color and brilliance with its unique Triple Shine Complex, a blend of high-performance ingredients that provide unstoppable wear and shine like “30 coats of lacquer.” This mint-scented gloss features a profusion of creamy pinks, shimmering lavenders, and iridescent brights that give lips a lush look with lasting color and unbelievable shine.

The color is very subtle and not at all "frosty". I really love it for everyday. I do feel I have to touch this up after about an hour or so depending on what I am doing. It is very smooth and not at all sticky. The next time I want to splurge on this lip gloss, I am going for this color:

photo credit

It's called "Allow Me" and it is a very pretty rose gold with shimmer. There are a total of 18 different colors in this line. 
I picked mine up at Sephora.

Another new favorite of ours, especially Sophia, is the awesome Burt's Bees Lip Crayon in Sedona Sands. 

Photo Credit


LOVE IT....and at $9 you can't really argue that price point. 

This is a very creamy MATTE nude color that has a slight pink hue. It does go on a bit dry but the lasting power is great. The line comes in a total of 6 different colors and we are excited to add a few more to our collection! To check out the other colors stop by your CVS or Walgreen's or click HERE!

Hope you like our beauty finds for the week :)

Linking to some of these parties: CLICK HERE FOR LIST!

Thursday, April 23, 2015

Gluten Free, Low Carb - Lavender Mint Cream Scones


We are so excited to join some Tea Parties, this week! If you are visiting from a party below, Welcome!!

Afternoon Tea has always brought us great delight. 


Sophia and I have been sharing in this wonderful tradition for years. When life gets hectic, there is nothing quite like slowing down and sipping a warm velvety tea from a pretty cup while snacking on dainty delights. 

So, so good for the soul. 

This week I made some wonderful scones I would like to share. I incorporated two of my favorite flavor accents this time of year, lavender and mint! 
This was also the first time I made scones that were gluten free & lower carb. 

I was worried about texture and taste but I was pleasantly surprised! They baked up and tasted just like regular scones. 


Perfect for spring!

GF, Low Carb - Lavender Mint Cream Scones

Ingredients:

2 cups almond flour*
1/2 cup coconut flour*
1/2 cup Stevia Brand Sugar Substitute 
1/4 cold salted butter
2 tsp dried lavender
1 1/2 tsp finely chopped mint
1/2 cup + 2 T cold heavy whipping cream
1 large egg
1/2 tsp vanilla extract
1 recipe for Sugar Glaze - see below


Instructions:

Line rimmed baking sheet with parchment. Set aside
Turn oven on at 425 degrees
In medium bowl, whisk flours and sugar.
Using pastry blender, cut butter into flour mixture until coarse and crumbly
Add lavender and mint, stir well. 

In small bowl combine 1/2 cup cream, egg, vanilla and whisk well. 
Add cream mixture to flour mixture and stir well to combine
Bring dough together with hands 
Add additional cream 1 T at a time until dough is uniform

Place dough on lightly floured surface and roll to 1/2 inch thick
Using 2 1/4 inch round cutters, cut 12 scones. 
If you don't have a cutter just shape scones into round 1/2 inch thick discs
Place on parchment paper and brush w/ remaining cream. 
Bake until edges are light golden brown approx 9-10 minutes
Remove scones to wire rack to cool. 
Drizzle w/ Sugar Glaze if desired

Sugar Glaze: combine 1 cup powdered sugar to 4 T whole milk (we skipped this step opting for fewer calories, less sugar) 

*If you don't want to make them gluten free, substitute 2 cups self rising flour


THANKS MOM FOR MY NEW CUP!! LOVE LOVE LOVE!!
Find me at these great link ups: Blog Love Here

Also sharing with these special parties:
Rose Chintz Cottage
Tuesday Cuppa Tea
Pint Sized Baker - Two Cup Tuesday
The Charm of Home
Show & Tell Friday

Friday, March 13, 2015

The Magic of Spring - Dum Dums Lollipop Garden!


We LOVE Dum Dums Lollipops!

What better way to usher in SPRING than with a magical lollipop garden! Start this fun tradition with your family this year!


Sophia and I are SOOO excited to be a part of #TheMagicofSpring with Spangler Candy, the makers of Dum Dums Lollipops. 


We hope you enjoy the video tutorial we put together for you on how to make your very own Magical Spring Lollipop Garden!


Here are the basic "ingredients" we used:
1. Dum Dum Lollipops
2. Magic Jelly Beans :)
3. Cute containers
4. Crumbled up chocolate cake or brownies (I used store bought to save time). I also put some pound cake slices in the bottom of the containers so the suckers would "stick" better. 
5. Edible Grass - you can also use coconut flakes mixed with a bit of green food coloring for edible grass too!
6. Lots of Fun and Love!!!!!!!

The point is to "plant" the magic jelly beans with your kids and have them be surprised the next day as the beans have sprouted into amazing Dum Dum Suckers! HOW CUTE!! You can incorporate this into your Easter celebration or simply as a fun way to celebrate spring. 

Here are some basic step by steps - the video tutorial goes into more detail with some added fun:

1. Take your cute containers and line them with wax paper. 


2. Use some pound cake to build up the bottom if needed


3. Crumble up your store bought brownies or cake or use whatever you have that will work for edible soil! YUM

4. Let the kiddos plant the magic jelly beans in the soil and VOILA, the next morning........MAGIC!


Take this idea and run or make your own. You can also do this outside, there are MANY ways to make this your own fun tradition. There are no rules, just have fun!


Tuesday, December 23, 2014

Grinch Heart Pudding Cookies - No Bake

Grinch Heart Pudding Cookies


What you need:
1. Keebler Shortbread Cookies
2. Pistachio Pudding Mix (Instant)
3. Whole Milk
4. Candy Hearts


How to:
1. Make pudding using only 1 1/4 cup milk. Whip till firm. 
2. Use small scoop to place pudding on shortbread cookie
3. Place heart in center of cookie!
4. Refrigerate or serve immediately. 


Easy, Cute, Fun

Photo Credit


Inspired by these awesome Grinch cookies seen Here at Katrina's Kitchen

Merry Christmas!

Sunday, December 21, 2014

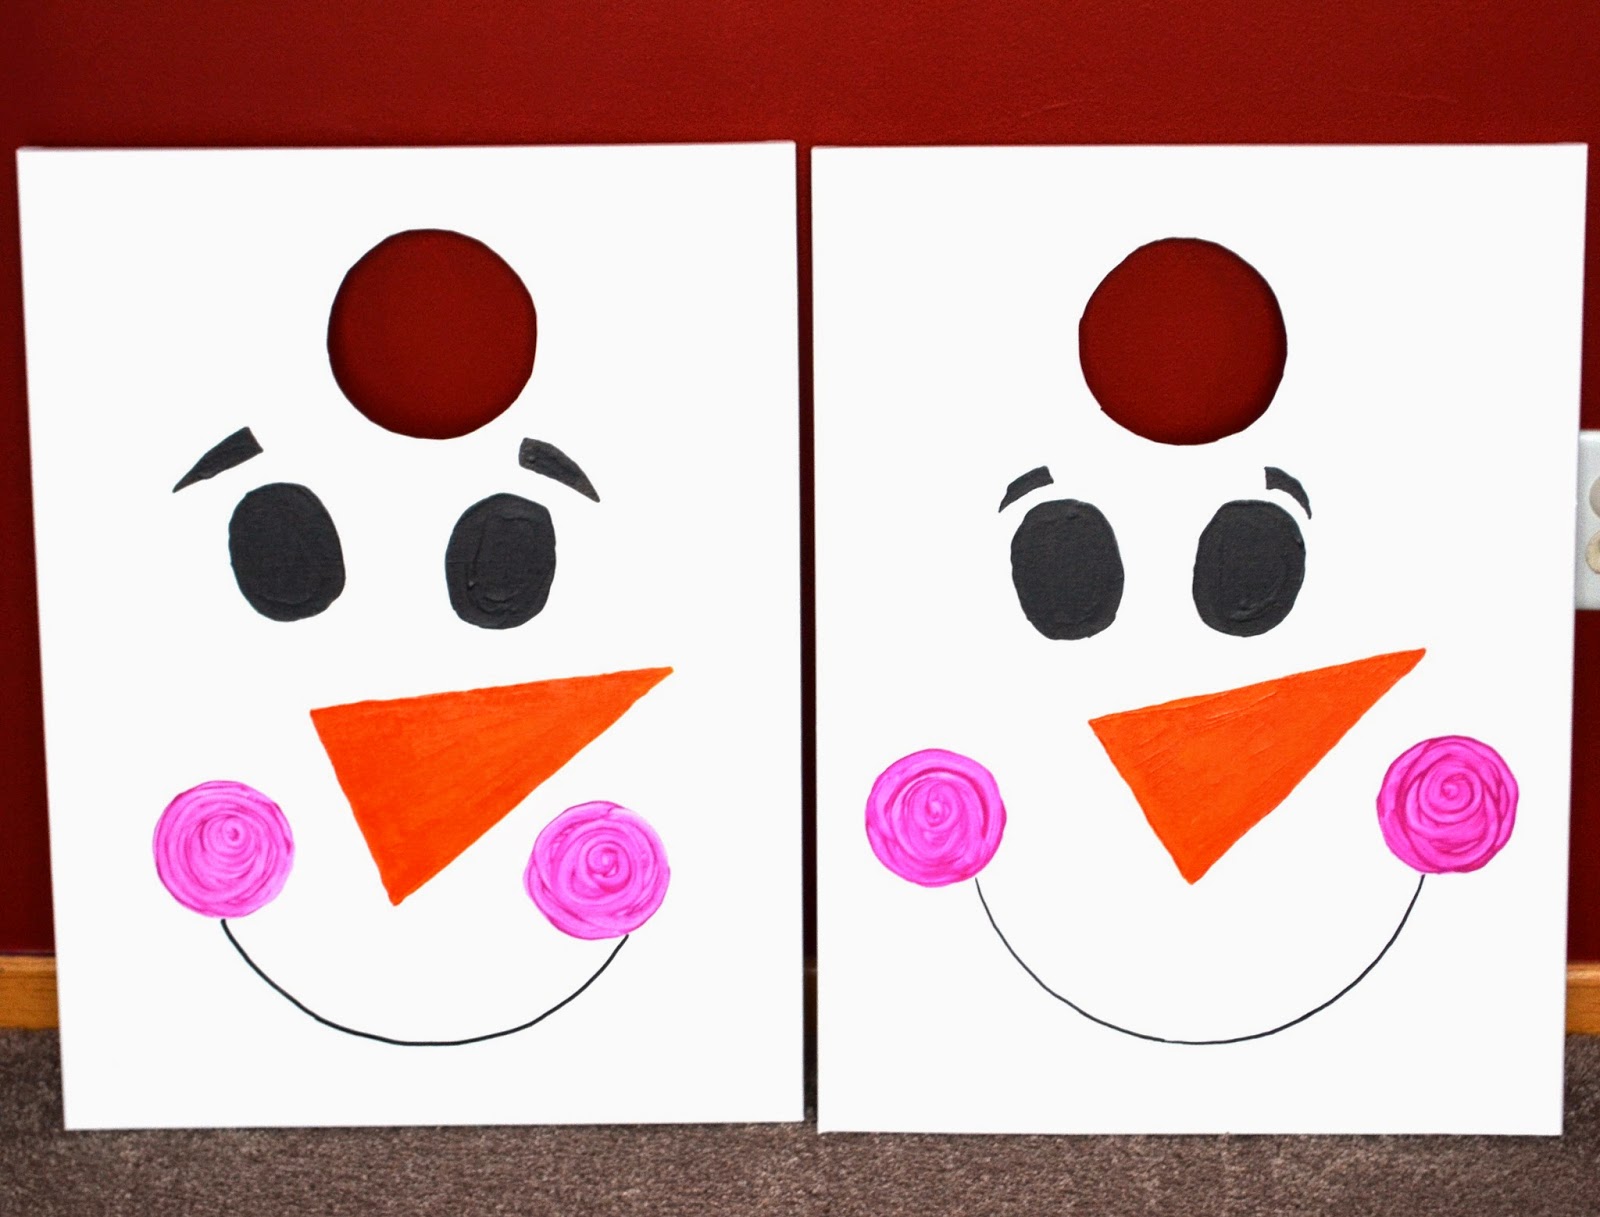
DIY Holiday Snowman Beanbag Toss Game + Christmas Class Party Ideas

DIY Snowman Beanbag Toss


Actually our beanbags were 
marshmallows and looked
a little like this:
Image from Kraft Website


Supplies:
2 Large White Canvas Boards 
Scissors
Orange, Black and Pink Paint or Sharpies


How To:
We used various objects to trace the eyes, hole in center as well as for the cheeks. 
We also used a dinner plate to help guide his cheerful smile. 
I did outline him in pencil before we got started. 

It was easy to cut the center hole. I just punched
through the center of the circle and 
easily worked my way around. 

We did use a black sharpie on his mouth
rather than paint and I am glad we did. 


Easy and Fun.

You can attach some wood blocks with
glue to the back if you want to keep it propped up however, they work great just propped up with books!

This is one of the games Sophia's class
will be playing at their Christmas party. 
Here are some other fun games we will play:

1. Stack red & green solo cups into a
Christmas tree - relay game

2. Toss little stuffed elves into large 
Christmas bags  - relay game

3. "Hot Santa" (aka Hot Potato) - toss a stuffed Santa around to music and when the music stops the one who has the Santa is OUT!

4. Draw a Reindeer - Topsy Turvy - in this fun and easy game the kids place paper plates on their head and then try to draw a Reindeer face or you can have them choose something else, maybe a Snowman?

5. Christmas Pictionary - have the kids try to draw out scenes to classic Christmas songs or items from the holidays! This is always a hit!


You can find us at these great blogs: HERE!  


Blogging tips